Using OOD’s Interactive Apps
There are a number of applications that you can access and use through the OOD web portal. When you select an application and click launch, the scheduler (Slurm) allocates a compute node with a predetermined number of cores and amount of memory. The default time for running any of the applications is one hour. It is recommended that you keep the default. If you ask for more than one hour, you will need to wait for Slurm to allocate a resource that can run for your requested time, which could take a long time to be allocated, depending on how busy the cluster is.
If you are attempting to run a job on one of the interactive apps on OOD that launches a graphical user interface (GUI), such as Maestro, you might get an error if your passwordless ssh is not set up correctly. See Using X11 for tips and troubleshooting information opening applications that use X11 forwarding.
Available Apps (November 2021)
On the Interactive Apps tab, you can view the list of available interactive apps through the OOD web interface.
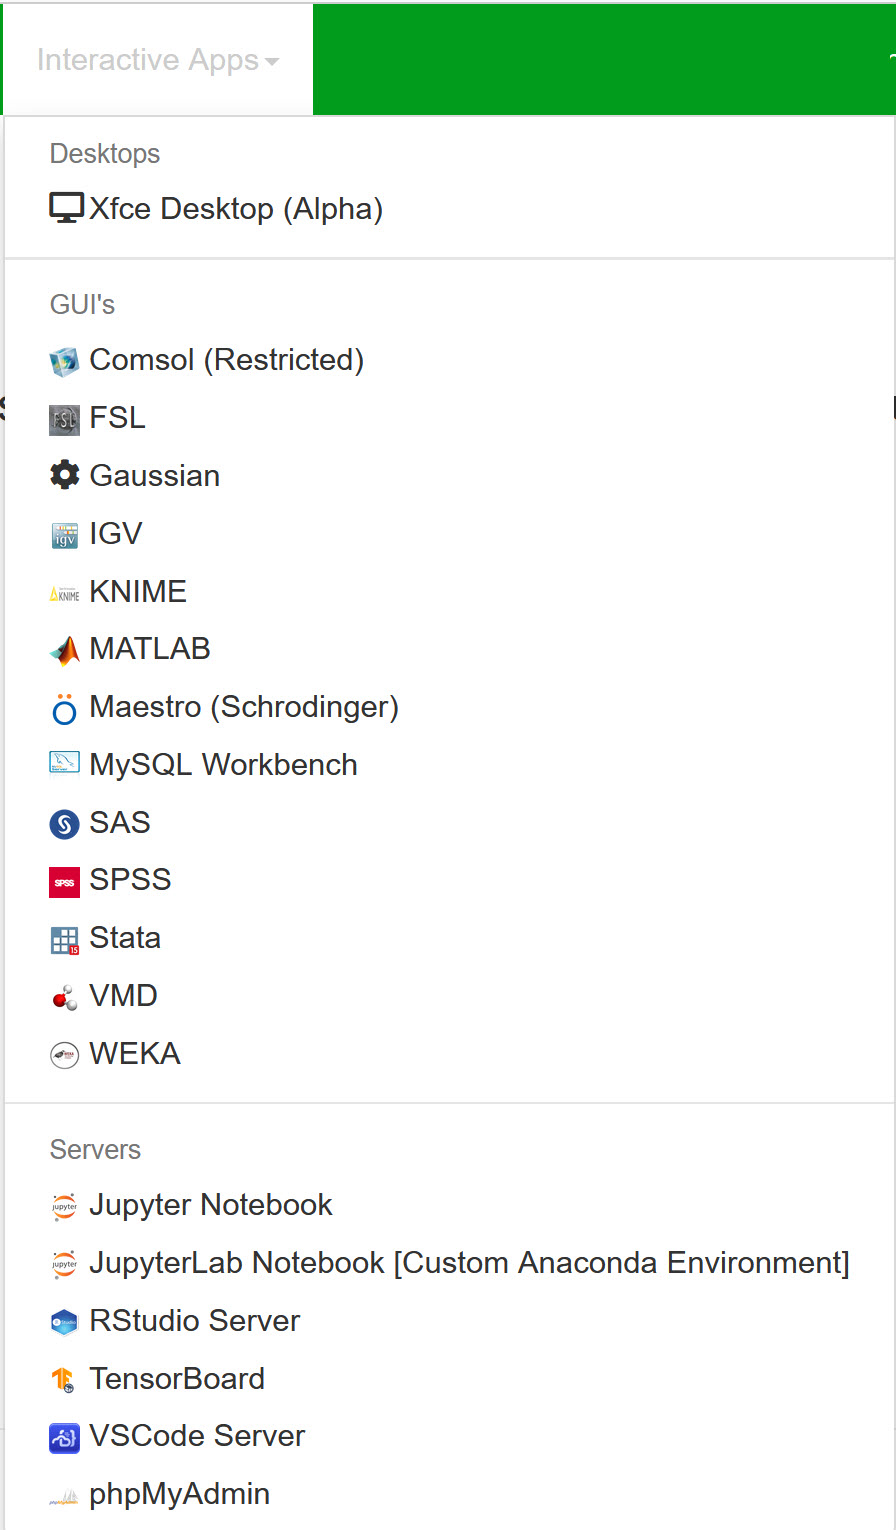
Note
Some apps are reserved for specific research groups and are not for general access. If you get an access error when attempting to open an app, and you believe that you should have access to it, please email rchelp@northeastern.edu with your username, research group, the app you are trying to access, a screenshot of the error that you are getting, and we will look into the issue.
- In a web browser, go to ood.discovery.neu.edu. If prompted, enter your myNortheastern username and password.
- Select Interactive Apps, then select the application you want to use.
- For most apps, keep the default options, and then click Launch. You might have to wait a minute or two for a compute node to be allocated with your requested time and resource.
- If you selected Jupyter Notebook, click Connect to Jupyter. A Jupyter Notebook opens in a new tab on your browser.
Tip
On the Jupyter Notebook Home tab, click New, then select the kernel you want to use, such as Python or R. Your selected kernel opens in a new tab on your browser. Click the Running tab to see a list of what Notebooks you already have running. If you already have a Notebook saved to your home directory, on the Files tab, click the name of the file to restart the Notebook in a new tab on your browser.
Working with Jupyter Notebook [Custom Anaconda Environment]
One of the interactive apps on OOD is Jupyter Notebook Custom Anaconda Environment. You need to do some initial setup in order to use this app effectively. This section will provide a walkthrough of setting up and using this app. The general workflow is to first create a virtual python environment; ensure that Jupyter Notebook is installed in your virtual environment; and then reference this environment when you start the Jupyter Notebook [Custom Anaconda Environment] OOD interactive app.
Virtual python environment
- First set up a virtual python environment. See Creating a Conda virtual environment with Anaconda for how to set up a virtual python environment on Discovery using the terminal.
- When your environment is ready, in the terminal type
source activateto activate the base environment. - Type
which condato get the full path of your environment. Make a note of the full path name. - Type
source activate <yourenvironmentname>where <yourenvironmentname> is the name of your custom environment to activate the environment you just created. - Type
conda install jupyterlabto install jupyterlab in your environment.
Using OOD to launch Jupyter Notebook
- Go to www.ood.discovery.neu.edu.
- Click Interactive Apps, then select Jupyter Notebook [Custom Anaconda Environment].
- Select the compute node features for the job:
- In the Time field, enter the number of hour(s) needed for the job. Minimum is one hour, maximum is 8 hours.
- In the Memory (in Gb) field, enter the amount of memory you need for the job. Minimum is 2GB, maximum is 128GB.
- If you need GPU, check Use GPU box.
- Select the Anaconda version that you used to create your virtual python environment in the System-wide Conda Module field.
- Check Custom Anaconda Environment box, and enter the name of your custom virtual python environment in the Name of Custom Conda Environment field.
- Click Launch. This will put you in the queue for a compute node. Note that this might take a few minutes, depending on the resources you requested.
- When you have been allocated a compute node, click Connect to Jupyter.
When your Juypter Notebook is running and open, type conda list in a cell and run the cell to confirm that the environment is your custom conda environment (you should see this on the first line). This command will also list all
of your available packages.